How to Use Samples in FL Studio Like a Pro
Using samples is one of the fastest, most powerful ways to get a professional-sounding track off the ground in FL Studio. The core idea is simple: get your sample pack folders into the FL Studio browser so you can find them instantly, drag what you need into your project, and start twisting and shaping those sounds until they fit perfectly. If you can lock down this basic workflow, you’ve unlocked the secret to turning raw audio into a finished beat.
Mastering Your Sample Workflow in FL Studio
Before you ever chop a loop or layer a kick, you need a workflow that just works. A messy, disorganized setup is the absolute enemy of creativity. It’s the difference between being in the flow and spending twenty minutes hunting for that one snare you downloaded last month.
The goal is to build a system inside FL Studio that feels completely intuitive—letting you get from an idea in your head to a pattern in the Channel Rack in seconds. This is more than just file management; it’s about eliminating the friction that pulls you out of your creative zone.
Think of your sample library as your main instrument. A guitarist doesn’t have to think about where to put their fingers to play a G chord. You should be able to grab the perfect kick, the right atmospheric loop, or a slick vocal chop just as instinctively. Honestly, getting this foundation right is probably the single most important part of using samples effectively.
Organizing Your Sounds for Instant Access
First things first: you need to tell FL Studio where your sounds live. Nobody wants to be digging through a maze of folders on their hard drive every time they need a hi-hat. That’s a certified workflow killer.
The solution is to add your go-to sample pack folders directly into the FL Studio Browser.
Just head over to Options > File Settings. You’ll see a section called “Browser extra search folders.” Click a folder icon, navigate to where you keep your sounds, and add the folder. Boom. It now shows up in the Browser panel on the left, ready for you to drag and drop anything you need. This one little setup step will change your life.
Playlist vs. Channel Rack: Where to Drag Your Samples
Okay, your library is locked and loaded. Now, where do you put the sounds? You’ve got two main options: the Playlist or the Channel Rack. Knowing which one to use and when is a huge part of working fast.
- The Playlist: This is your spot for longer audio clips. Think melodic loops, full vocal takes, or stems from construction kits. When you drop a sample here, it becomes an Audio Clip, which is perfect for arranging the main structure of your song from start to finish.
- The Channel Rack: This is home base for your one-shots—kicks, snares, hats, claps, and short stabs. Dragging a sample here creates a Sampler Channel. From there, you can easily program patterns using the Step Sequencer or get more detailed in the Piano Roll.
Here’s a simple rule I live by: If you want to sequence it into a pattern, drop it in the Channel Rack. If you want to arrange it on the timeline as a block of audio, use the Playlist. Getting this distinction down is fundamental to building beats quickly in FL Studio.
The Importance of Key and BPM Metadata
Pay attention to the filenames. Seriously. Most professional sample packs include crucial info right in the name, like the key (e.g., Cmin) and the original tempo (e.g., 140bpm). This isn’t just for decoration; it’s a massive time-saver.
Imagine your project is chugging along at 120 BPM in the key of A minor. Instead of guessing, you can quickly scan your library for loops and sounds that are already a perfect match. This lets you audition ideas on the fly and keep your track sounding cohesive without a ton of painful time-stretching or pitch-shifting.
Sure, you can always force a sample to fit, but starting with sounds that are already compatible gives you a much cleaner, more professional result with way less work. Making this a habit will dramatically speed up your process and make your beats sound better from the get-go.
The Art of Chopping and Manipulating Samples
Once you’ve got a smooth workflow down, the real fun begins. This is where you stop just dragging and dropping audio files and start turning them into the core of your unique sound. Chopping, slicing, and warping samples aren’t just technical busywork; they’re the heart of the creative process, especially in modern production.
The whole game of sampling has absolutely exploded, defining countless hits over the past few years. Between 2020 and 2024, sample-based production quietly became one of the clearest signs of where music is headed, particularly for hip-hop and electronic producers. We’re talking hundreds of millions of downloads annually on major platforms. Splice, for example, reported “nearly 350 million” sound sample downloads in 2024, just after a period where producers were grabbing over 400 million samples a year during the 2020 lockdown.
That breaks down to nearly 1 million samples downloaded every single day—from just one platform. If you want to dive deeper into these numbers, Music Business Worldwide has some great insights.
This tells us one crucial thing: to make your music stand out, you have to get creative with how you flip your samples.
The diagram below gives you a bird’s-eye view of the basic workflow—finding a sound, then getting it into your project.
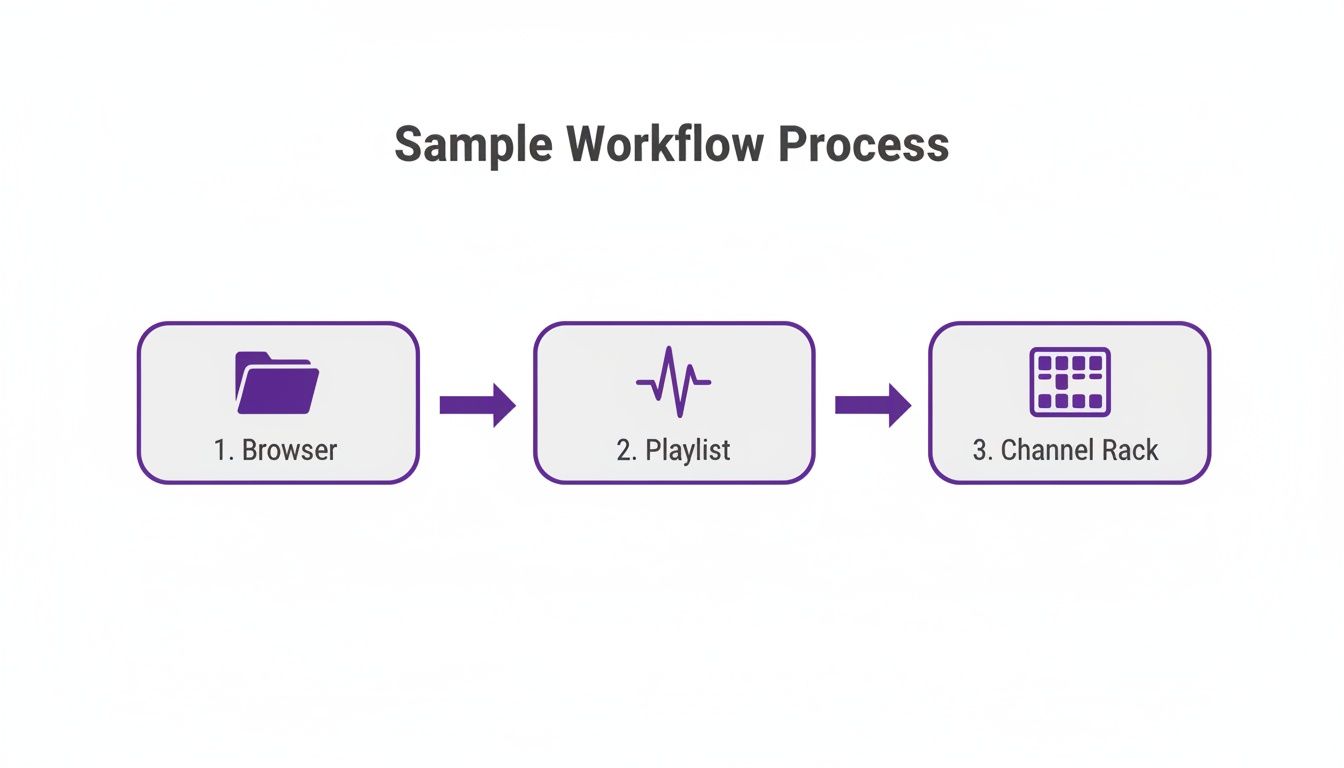
This simple path from the Browser to your Playlist or Channel Rack is the launchpad for all the really cool chopping techniques we’re about to get into.
Turning Loops into Playable Instruments
FL Studio gives you two killer native tools for chopping samples: Fruity Slicer and Slicex. They both get you to a similar place, but they offer different levels of control.
- Fruity Slicer: This is your quick-and-dirty option. Just drag a loop onto the Fruity Slicer channel, and it automatically slices the audio at every transient (like the start of a drum hit or a chord). Bam—those slices are instantly mapped across your MIDI keyboard, turning that loop into an instrument you can play.
- Slicex: When you need to get surgical, Slicex is the tool. It gives you a big, detailed waveform and lets you manually add, move, or delete slice markers. It’s perfect for isolating specific words in a vocal sample or grabbing just the right chord out of a complex piano loop.
Let’s say you’ve found a dope, soulful guitar loop from a pack of quality hip-hop samples. Instead of just looping it, you could load it into Slicex, isolate each individual chord, and then replay them in a completely new order. Just like that, you’ve created a fresh, original melody to build your entire track around.
Time Stretching and Pitch Shifting Your Samples
It’s rare that a sample fits your project’s tempo or key perfectly right out of the box. That’s where FL Studio’s time-stretching and pitch-shifting algorithms become your best friend. Just double-click any audio clip in your Playlist, and you’ll find the “Time” knob and “Mode” dropdown under the “Time stretching” section.
Pro Tip: Getting to know these modes is a game-changer. ‘Resample’ is your go-to for that old-school MPC vibe where the pitch changes with the tempo, but be warned—it can add some digital artifacts. For most melodic loops, ‘Stretch’ is usually the cleanest choice, letting you change the tempo without affecting the original pitch.
Here’s a quick rundown of the modes I use most often:
| Mode | Best For | Why It Works |
|---|---|---|
| Resample | Vintage drum breaks & vocals | Creates that classic “chipmunk” or slowed-down effect; pitch and tempo are linked. |
| Stretch | Melodic loops & full songs | Keeps the original pitch intact while changing the tempo. It’s clean and transparent. |
| e3 Generic | Most audio types | A high-quality, all-around algorithm that gives you a great balance of sound quality and performance. |
| e3 Mono | Vocals & solo instruments | Optimized for monophonic sounds to help reduce phasing issues and unwanted artifacts. |
Picking the right algorithm is all about context. If you want to speed up a drum loop while keeping the transients snappy and clean, ‘Stretch’ or ‘e3 Generic’ will probably work best. But if you’re chasing that gritty, classic hip-hop sound, ‘Resample’ is the only way to go. You have to experiment to find what serves the track. This is how you take a generic sample and make it completely yours.
Building Full Beats with Construction Kits
Construction kits are hands-down one of the best shortcuts for learning and creating in modern music production. Imagine getting a fully mixed beat, but broken down into every single individual track—the drum stems, the bassline, the synth melodies, and all the effects. That’s a construction kit.
They give you an incredible behind-the-scenes look at how a professional track is put together. Instead of just a single stereo loop, you get all the raw ingredients. This approach completely demystifies the arrangement process and lets you build a solid foundation for a new track in just minutes. It’s the perfect cure for writer’s block.
Deconstructing a Professional Beat
The quickest way to wrap your head around a construction kit is to just drag all the audio stems from one kit straight into the FL Studio Playlist. Line them all up at the start, hit play, and you’ll hear a complete, professionally arranged beat section.
But that’s just the start. This simple act is actually a powerful learning exercise. Now you can solo each element to see what makes the beat tick.
- Solo the drum loop: Really listen to how the kick and snare lock in to create that solid rhythmic pocket.
- Solo the bassline: Pay attention to how it grooves with the kick drum, driving the whole low end.
- Solo the melody: Hear how the chords and lead lines provide the track’s emotional core.
By listening to each part on its own and then hearing how it fits with everything else, you gain a deep, intuitive understanding of professional arrangement. It’s like getting a private lesson from the producer who made the beat.
Mix and Match for Unique Hybrids
Using a single kit is fantastic for learning, but the real magic happens when you start mixing and matching elements from different kits. This is where you can start crafting a sound that is uniquely yours.
Let’s say you find a killer drum loop in a gritty trap kit, but you also love a smooth, soulful piano progression from an R&B kit. There’s absolutely nothing stopping you from smashing them together.
By pulling stems from various kits, you can create hybrid tracks that sound completely new. Try taking the drums from one kit, the bassline from another, and a lead synth from a third. This method ensures your beat is original and not just a carbon copy of the demo track.
This modular approach gives you a nearly infinite palette to paint with. When you’re browsing through different FL Studio sample packs, stop thinking of each kit as a single song. Instead, see it as a collection of high-quality, compatible parts ready to be used anywhere.
Construction kits are collections of individual files—stems, one-shots, and MIDI—that can be used in countless ways. Here’s a quick breakdown of what you’ll typically find and how to get creative with each component.
| Leveraging Construction Kit Components | ||
|---|---|---|
| Component Type | Primary Use Case | Creative Technique Example |
| Full Mix Demo | A quick preview of how all the elements sound together. | Drag it into Slicex and chop it up to create a completely new, glitched-out melodic loop. |
| Drum Stems | Isolated loops for kick, snare, hi-hats, and percussion. | Layer the hi-hat loop from a trap kit over the kick/snare from a boom-bap kit for a modern hybrid feel. |
| Melodic Stems | Isolated loops for bass, synths, pianos, and guitars. | Take a synth lead, reverse it, and drench it in reverb to create an atmospheric transitional effect. |
| One-Shots | Single drum hits (kick, snare, etc.) used in the loops. | Load the kick one-shot into a sampler and create your own custom drum pattern that fits your track perfectly. |
| MIDI Files | The raw note data for melodies and chord progressions. | Use the piano MIDI with a completely different instrument, like a gritty analog synth VST, for a fresh sound. |
As you can see, each part of the kit offers a jumping-off point for your own ideas.
Taking Control with MIDI Files
Many of the best construction kits include a game-changing bonus: MIDI files. These aren’t audio; they’re the raw note data for the melodies, chords, and basslines. This is a massive advantage for any producer who wants total command over their sound.
Here’s a simple workflow to unlock their power:
- Find a MIDI file you like (e.g.,
Piano_Progression_120bpm_Cmin.mid) and drag it onto an empty channel in the Channel Rack. - FL Studio will ask you to assign an instrument. Go ahead and pick your favorite synth or sampler—FLEX, Sytrus, or any third-party VST you own.
- Now, that professionally written chord progression is playing through your sound. You can tweak the preset, pick a completely different patch, or jump into the Piano Roll to edit the notes and make the melody your own.
This gives you the best of both worlds: a proven musical idea from an expert, but with your own sonic signature stamped all over it. You get a solid foundation without being locked into a single sound.
Layering and Processing for a Polished Sound
Raw samples are just the starting line. The real magic—what turns a decent beat into a professional-sounding track—happens when you start layering and processing. This is where you get to mold individual sounds so they work together as one cohesive, powerful unit.
Honestly, it’s less about memorizing complex audio engineering theory and more about making smart, intentional choices.
Anyone can drag a loop into their project. But making it sit perfectly in a dense mix without turning everything to mud? That requires a bit more finesse. This is the stage where you start to think like a mixing engineer, even if you’re just cooking up a simple beat. The goal is simple: give every sample its own space to shine without stepping on everything else.
Strategic Layering for Impact
One of the absolute best ways to make your tracks hit harder is to layer samples. By combining sounds, you can create something bigger and more textured than any single sample could ever be on its own. This is especially true for drums, the backbone of pretty much any modern track.
Let’s take a common problem: beefing up a kick drum. You might find a kick sample that has a fantastic, snappy attack but just sounds thin in the low end. Instead of spending hours hunting for that one “perfect” kick, just build it yourself.
- Find a punchy kick: This sample will provide the initial transient—that sharp “click” that helps the kick cut through the mix.
- Find a clean sub-bass sample: A simple sine wave or a deep 808-style bass tone works perfectly for this.
- Layer them together: Just place the sub sample right underneath the kick on another track. You might need to nudge the sub forward or backward by a few milliseconds to make sure they’re in phase. If they’re out of phase, they can actually cancel each other out and sound weaker.
And this technique isn’t just for kicks! Layer a couple of snares to get the perfect blend of body and crack. Or take two different hi-hat loops, pan one slightly left and the other slightly right, and suddenly you have a much wider, more interesting stereo feel.
The real key to successful layering is making sure every single sample serves a specific purpose. Don’t just stack sounds on top of each other for the sake of it. Always ask yourself: What is this layer adding? Is it punch? Warmth? Width? Texture? If you can’t answer that, you probably don’t need it.
A Practical Processing Chain for Sampled Loops
Once your sounds are layered up, it’s time to process them so they actually fit together. The good news is you don’t need a bunch of expensive third-party plugins. FL Studio’s stock plugins are more than powerful enough to get a polished, professional sound.
Let’s walk through a simple but super effective mixing chain for a melodic loop using only stock tools. First thing’s first, route your sample to a free mixer track.
- Fruity Parametric EQ 2 (EQ): Think of this as your surgical tool. The first move should almost always be subtractive EQ—cutting frequencies out. Use a high-pass filter to get rid of any unnecessary low-end rumble that could clash with your kick and bass. After that, hunt for any harsh or muddy frequencies (often hiding in the 200-500 Hz range) and gently scoop them out with a narrow band.
- Fruity Compressor (Dynamics): Compression is all about taming the dynamics of a sample, making it sound more consistent and punchy. For a melodic loop, try starting with a slow attack and a fast release. This setup lets the initial transients poke through but brings up the quieter parts of the sound, making it feel fuller and more present.
- Fruity Fast Dist (Saturation): A little bit of subtle distortion or saturation can work wonders. It adds warmth, character, and harmonics that help a sample cut through a busy mix without you having to just turn up the volume. The key word here is subtle. You don’t want to hear obvious, crunchy distortion; you just want to feel a bit more richness and presence.
- Transient Processor (Shape): For drum loops or any percussive sample, FL Studio’s built-in Transient Processor is an absolute secret weapon. Want your snares to smack harder? Just turn up the Attack knob. Need to soften the harsh click of a hi-hat? Turn the Attack down and maybe bump up the Release. This tool gives you direct, dead-simple control over the punchiness of your sounds.
By following this simple chain—carve, control, color, and shape—you can take any raw sample and make it sit perfectly in your track. Whether you’re working with melodic loops or looking for the perfect punch, understanding how to use samples with these processing techniques is what separates an amateur beat from a professional production. For those looking to build a solid foundation, exploring high-quality drum sounds for hip hop can provide the perfect starting point for these layering and processing methods.
Advanced Sampling and Sound Design Techniques
Once you’ve got the hang of chopping, layering, and some basic EQ and compression, it’s time to dive into the deep end. This is where you really start to transform samples into sounds that are completely yours—textures, rhythms, and tones that nobody else has. We’re talking about techniques that push your samples to their absolute limits.
This level of sound mangling isn’t just a creative exercise; it’s becoming a crucial skill. The entire creator economy is exploding, and sample-based production is right at the heart of it. According to the IFPI’s 2023 Global Music Report, recorded music revenues hit a staggering US$26.2 billion in 2022.
A huge chunk of that growth comes from independent artists, who generated around US$2.1 billion in 2023—a 27% jump from the year before. For so many of these artists, high-quality, royalty-free samples are the ticket to a professional sound without a six-figure studio budget. As music consumption spreads across streaming, social media, and short-form video, producers who can quickly flip their sample-based tracks into something new have a serious edge.
The Art of Resampling Your Creations
Resampling is a classic studio trick that feels right at home in FL Studio. The concept is beautifully simple: take all your carefully layered and processed sounds, send them to a new mixer track, and record the result as a single, fresh audio file.
Imagine you’ve layered a punchy kick with a deep sub, thrown in a crunchy snare, and glued them together with some EQ and saturation. Instead of leaving all those separate channels and plugins running, you can “print” the final sound to a new audio clip.
This workflow is a game-changer for two big reasons:
- It frees up your CPU. Once your sound is resampled, you can disable the original channels and effects. This instantly gives you back precious processing power for the rest of your track.
- It forces you to commit. This might sound scary, but it’s a massive creative boost. By finalizing a drum break or a melodic loop, you stop endlessly tweaking and start moving forward with arranging the song.
To pull this off, just route the output of your source mixer tracks to a fresh, empty one. Arm that new track by clicking the little red dot at the bottom, then hit record in the main transport bar. Everything that plays through that channel gets captured as a brand-new sample right in your project.
Creative Effects with Gross Beat
If there’s one plugin that defines the sound of modern FL Studio production, it’s probably Gross Beat. It’s the secret sauce behind countless stutter edits, half-time breakdowns, and glitchy transitions you hear in trap, hip-hop, and electronic music.
At its core, Gross Beat is a time and volume manipulator. It gives you a grid where you can literally draw in patterns to mess with the playback of your audio. You can create rhythmic gates, classic tape-stop effects, and intricate stutters with just a few clicks.
For a quick taste of its power, drop a drum loop onto a track and load up Gross Beat. Open the presets and head straight for the “Momentary” folder. Clicking on presets like “1/2 Speed” or “Stutter 2” will immediately show you what’s possible. The real pro move is to automate Gross Beat so it only kicks in at specific moments, like a fill at the end of a phrase, for maximum impact.
Exploring Granular Synthesis
For the truly adventurous, the Fruity Granulizer opens up the wild world of granular synthesis. This technique is all about demolition and reconstruction—it smashes a sample into microscopic pieces called “grains” and then reassembles them in completely new ways.
This is the perfect tool for turning any simple sound into a massive, evolving texture or a dreamy atmospheric pad.
Take a single piano note from a sample pack. By loading it into Fruity Granulizer and playing with the grain spacing and attack times, you can stretch that short, percussive hit into a lush, cinematic soundscape. It’s a process that rewards pure experimentation, letting you find sounds hidden inside your library you never knew existed. This is how you stop using samples and start truly inventing with them.
Common Questions About Sampling
As you get deeper into using samples, a few common questions always seem to pop up. Getting stuck on a technical issue is a surefire way to kill a creative vibe, so let’s clear up some of the most frequent hurdles producers face.
Think of this as building your foundation. Once you nail these concepts, you’ll have the confidence to tackle more advanced techniques without breaking your flow.
How Do I Match a Sample’s Key and Tempo?
This is probably the biggest challenge when you first start. You’ve got a track going in G minor at 130 BPM, but you find an amazing loop that’s in D major at 95 BPM. It’s not going to fit right out of the box. So, how do you make it work?
First, you need to figure out the sample’s original stats. Most professional packs helpfully include this info right in the filename. If not, FL Studio has the tools to help you investigate.
- Finding the Tempo: Double-click your sample to open the Channel Sampler. Find the Time knob, give it a right-click, head to “Autodetect,” and pick a tempo range that seems close. FL Studio will do its best to analyze the audio and give you a solid estimate.
- Finding the Key: While you can use FL Studio’s Newtone for this, a dedicated plugin like Mixed In Key or even a free online tool is often much quicker for a fast analysis. Knowing the key is absolutely critical for making melodic samples play nice together.
Once you have the tempo and key, you can use all the time-stretching and pitch-shifting tools we’ve already covered to bend the sample to your project’s will.
Pro Tip: When you’re tweaking the pitch in the Channel Sampler, remember that a 100 cent adjustment on the “Pitch” knob equals one semitone (like moving from A to A#). This is the key to accurately retuning your melodic samples.
What’s the Real Difference Between Loops and One-Shots?
This is a classic beginner question, and the distinction is simple but super important for how you build your tracks.
A loop is a self-contained musical idea designed to repeat seamlessly. We’re talking about things like a four-bar drum groove, a synth chord progression, or a funky bassline. Loops are perfect for quickly sketching out the foundation of a song and work best as Audio Clips dragged directly into the Playlist.
A one-shot, on the other hand, is just a single sound event. Think of individual drum hits—a kick, a snare, a hi-hat—or things like a vocal stab or a synth riser. These are the raw building blocks you use in the Channel Rack to program your own custom patterns from scratch.
Are These Samples Actually Royalty-Free?
The legal side of sampling can feel like a minefield, but when you’re using commercial sample packs, the answer is almost always a simple one.
Yes, for the most part. When you legally buy a pack from a reputable company, you’re getting a royalty-free license. This means you have the green light to use those sounds in your own music and release it commercially on Spotify, Apple Music, or anywhere else. You don’t owe the sample creator any extra money or royalties down the line.
That said, it’s always smart to glance at the license agreement that comes with any pack you download. While the royalty-free model is the industry standard 99% of the time, you might find rare exceptions with older or more obscure libraries. A quick read gives you total peace of mind.
Ready to stop searching and start creating? FL Studio Sound Packs offers a massive, royalty-free library of loops, one-shots, construction kits, and MIDI files to fuel your next hit. Get instant access to thousands of professional sounds for one single price.
Explore the full catalog at https://www.flstudiosoundpacks.com