Your Guide to Free FL Studio Sound Packs for Better Beats
Ever wondered how producers crank out professional-quality tracks without spending a fortune on sounds? The secret often lies in free FL Studio sound packs. These collections of royalty-free loops, drum kits, and MIDI files are the ultimate cheat code for building a massive sound library on a budget.
They’re a game-changer for anyone making music, offering the core ingredients for just about any genre you can think of, from hard-hitting hip hop to atmospheric electronic beats.
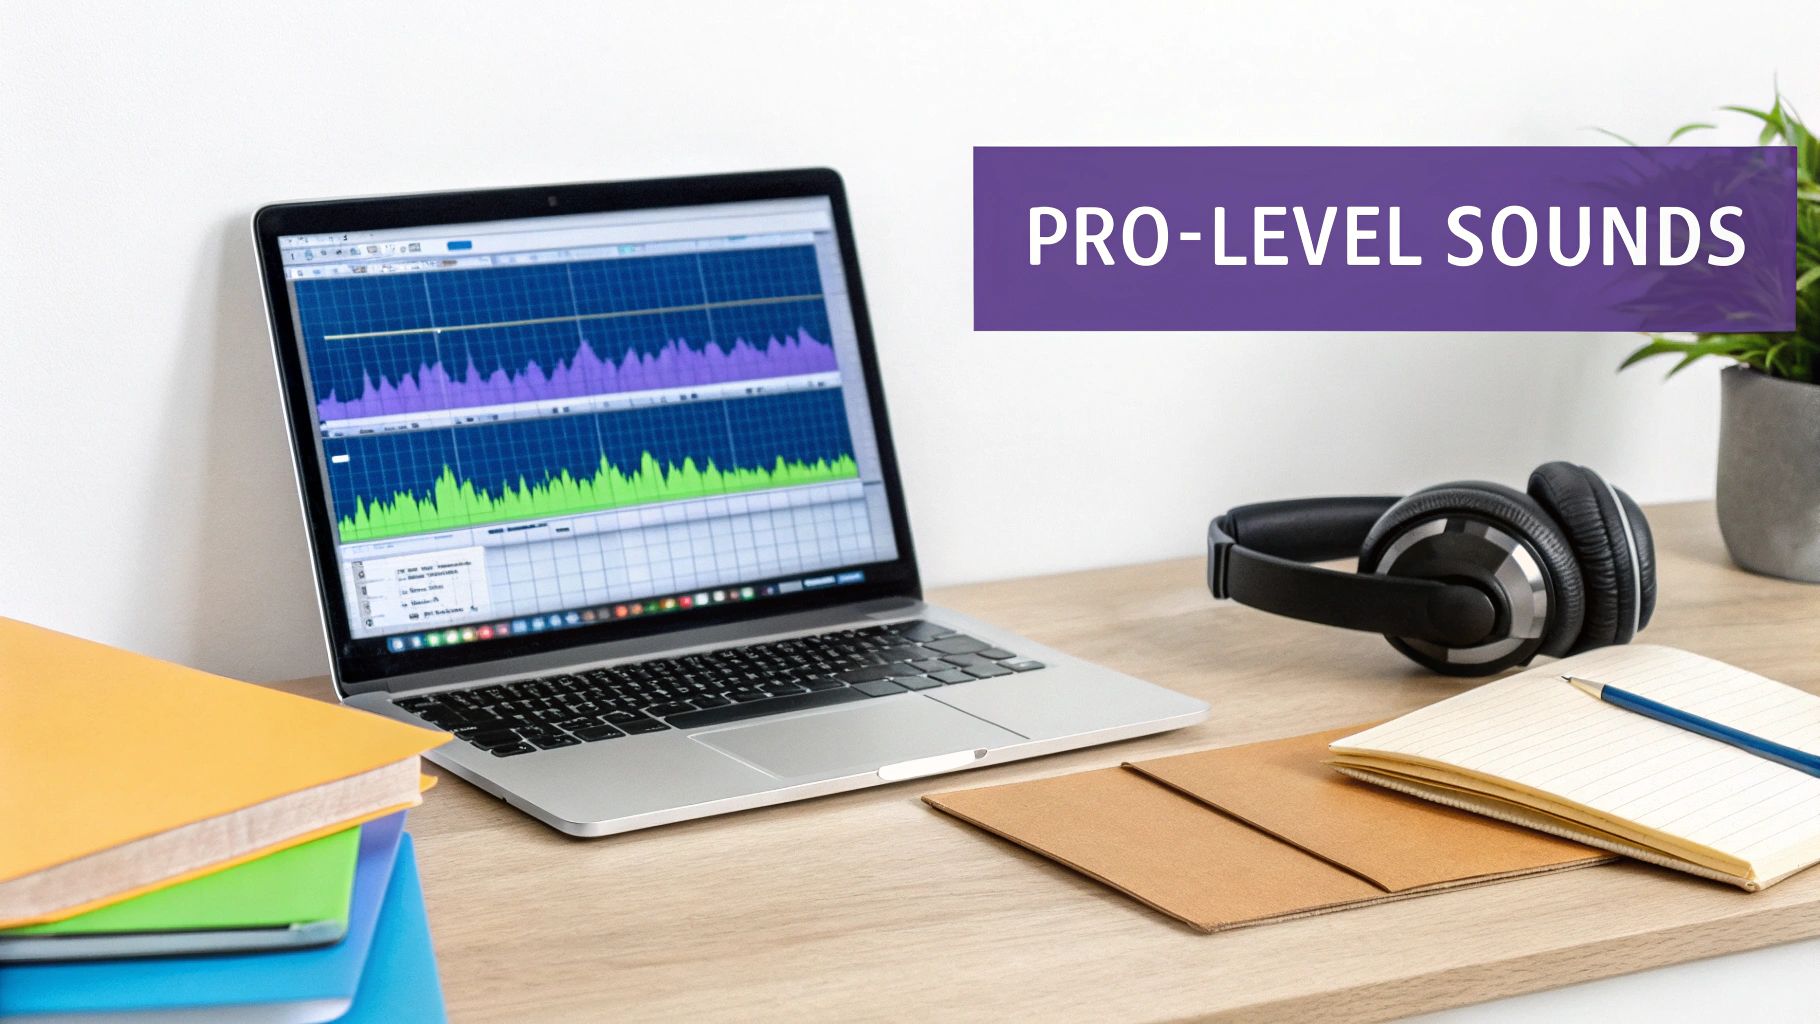
Unlock Pro-Level Sounds Without Spending a Dime
Imagine having a huge, curated library of professional sounds ready to drag and drop right into your next project. That’s exactly what free FL Studio sound packs give you. They’re way more than just a folder of random audio files; they’re creative toolkits designed to kickstart your workflow and spark new ideas when you feel stuck.
This kind of accessibility has totally leveled the playing field. With FL Studio being the weapon of choice for a massive 57% to 65% of home producers, the demand for high-quality, compatible sounds has absolutely exploded. The platform’s famous workflow and die-hard community make it the perfect place for these packs to shine. If you want to see just how dominant the DAW has become, you can read more about the current state of music production.
What’s Inside a Sound Pack?
So, what do you actually get when you download one of these packs? While every pack is different, most give you a core set of assets that form the foundation of modern music. These elements are designed to work together, giving you everything you need to build a song from the ground up.
Let’s break down the common assets you’ll find and what they’re best for.
| What You’ll Find Inside a Sound Pack | ||
|---|---|---|
| Asset Type | Description | Best Use Case |
| One-Shots | Single drum hits like a kick, snare, or hi-hat. They’re individual, isolated sounds. | Programming your own custom drum patterns from scratch in the Channel Rack or FPC. |
| Loops | Short, repeating audio phrases, like a drum beat, a bassline, or a guitar riff. | Quickly establishing a groove, finding inspiration, or adding layers to your track in the Playlist. |
| MIDI Files | Musical data (notes, chords, velocity) instead of actual audio. | Assigning your own VST instruments to a pre-written melody or chord progression for total creative control. |
This combination of audio and MIDI makes free sound packs incredibly powerful. They offer both instant gratification for quick ideas and deep customization for when you want to really dig in and make something your own, no matter your skill level.
Think of a sound pack as a producer’s toolkit. One-shots are your raw materials, loops are your pre-built components, and MIDI files are your architectural blueprints—each serving a distinct purpose in constructing your final track.
Where to Find High-Quality Sound Packs That Are Actually Free
Trying to find free FL Studio sound packs online can feel like digging for gold without a map. There are tons of sites promising free downloads, but not all of them are safe, legal, or even decent quality. The real trick is knowing where the pros go to find legit freebies without any strings attached.
Your first stop should always be dedicated sample pack websites. These platforms are built for producers, and most of them have free sections designed to bring in new customers. Think of them as specialty shops—their reputation is on the line with every product, even the free ones.
Another goldmine is the “freebies” section on major producer marketplaces. These are huge online stores where countless creators sell their packs. They’ll often post free taster packs to give you a preview of their work, which is an amazing way to snag pro-level sounds from established names.
Tapping into Producer Communities
Beyond the usual storefronts, producer communities are buzzing with shared sounds. Places like Reddit have entire subreddits, like r/Drumkits, where creators share original, royalty-free kits they’ve built from scratch. It’s a more direct, peer-to-peer way to find unique sounds that haven’t been used in a million other tracks.
What’s great about these communities is the built-in quality control. If a pack has glitches or isn’t actually free, other producers will call it out in the comments almost immediately. This peer-review system is a lifesaver for avoiding sketchy downloads.
A smart move by top-tier sound design companies is offering high-quality free packs if you sign up for their newsletter. It’s a total win-win: you get professionally made sounds, and they get to let you know when they drop something new.
Leveraging Site-Specific Offers
Lots of websites will give you exclusive content just for creating a free account. For example, here at FL Studio Sound Packs, signing up gets you access to a rotating selection of free downloads. It’s a common, legit practice that lets you start building your sound library right away with professionally curated stuff. You can find more tips like this in our guide on finding sound packs free of charge.
This approach has some serious perks:
- Guaranteed Quality: The sounds are often pulled straight from premium collections.
- Legal Safety: You know everything is cleared for use because it’s coming directly from the source.
- Fresh Content: Since the offers rotate, there’s always something new to grab.
The most critical part of this whole hunt is telling the difference between a real freebie and pirated content. Legitimate free packs will always be clearly labeled as royalty-free and usually come with a text file explaining your usage rights. If you see a site offering packs from big-name artists for free that cost money everywhere else, that’s a massive red flag. Stick to trusted sources, and you’ll build a killer library without worrying about legal trouble down the road.
Integrating and Organizing Sounds in FL Studio
So you’ve downloaded a folder packed with amazing new sounds. That’s a great start, but it’s only half the battle. A massive library of free FL Studio sound packs is completely useless if you can’t find that perfect snare or the right loop the second inspiration strikes. This is where a smart, organized system becomes your biggest asset, turning a pile of digital clutter into a high-speed creative workflow.
Think of your sound library like a chef’s professional kitchen. The disorganized chef wastes precious time fumbling through messy cabinets for the right spice, letting the creative spark fizzle out. But the pro? They have everything neatly labeled and sorted, ready to grab at a moment’s notice. Your goal is to build that same level of instant efficiency.
This simple process is a great way to think about how you source new sounds for your library.
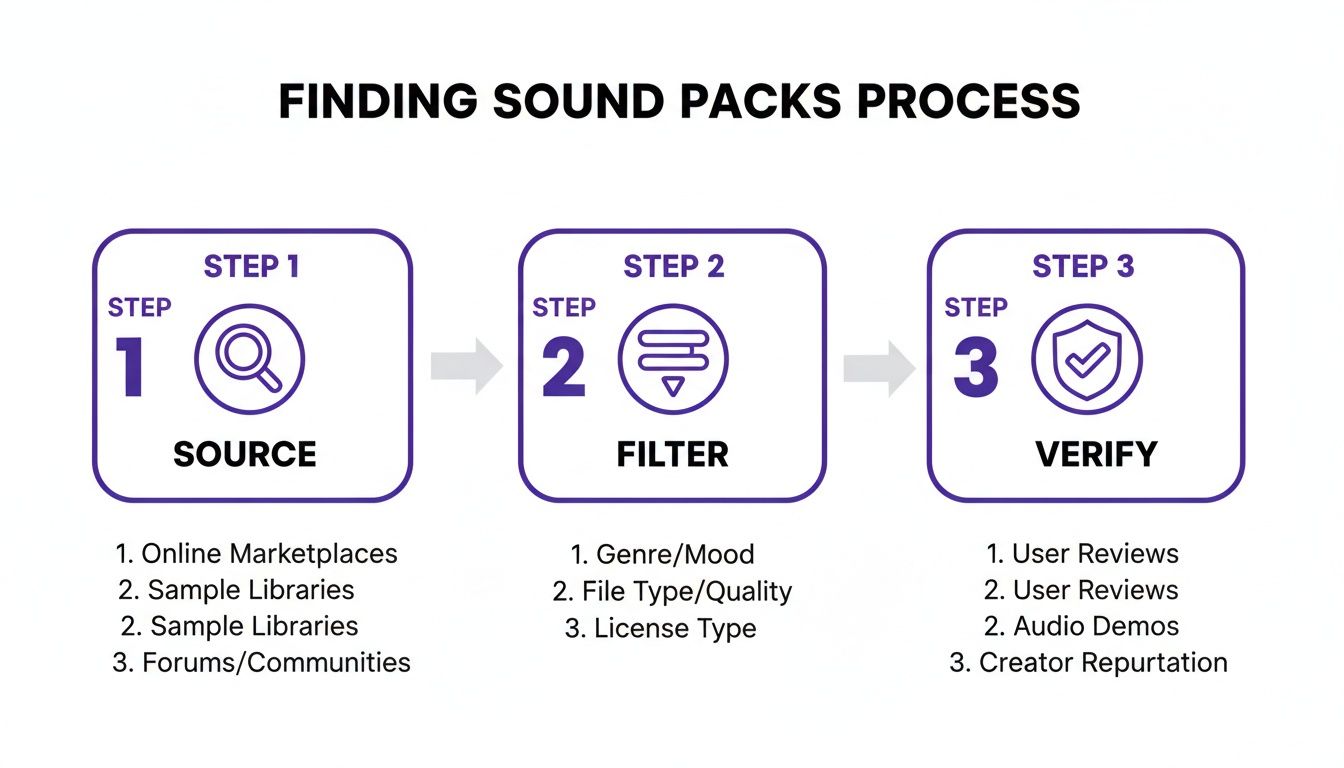
The key takeaway here is that finding killer sounds isn’t just about downloading. It’s a deliberate process of sourcing good material, filtering it for quality, and making sure the license is legit.
Getting Your Sound Packs into FL Studio
Before you can even think about organizing, you need to tell FL Studio where your sounds actually live. This is a simple but absolutely crucial step that connects your downloaded packs to the FL Studio Browser, making them instantly accessible right inside your projects. Forget dragging files from random desktop folders—this method integrates them directly into your workflow.
Here’s how to get it done:
- Unzip Your Files: Almost every sound pack you download will come in a compressed .zip or .rar file. Just right-click and extract the folder to a permanent spot on your computer. A dedicated hard drive just for samples is a fantastic idea if you have one.
- Open FL Studio Options: Inside FL Studio, navigate to Options > File Settings. This is the control center for telling FL where to find everything.
- Add Your Folder: Look for the “Browser extra search folders” section and click on an empty folder icon. A window will pop up, letting you browse to and select the main folder where you store all your sound packs.
- Refresh Your Browser: Once you’ve added the folder, your new sounds should pop up in the FL Studio Browser on the left side of your screen. If you don’t see them, just click the small arrow at the top of the Browser and hit “Refresh.”
Strategies for Smart Organization
Alright, now FL Studio can see your sounds. It’s time to get them organized in a way that makes sense. The global Creator Sound Packs market is absolutely booming, valued at over $1.2 billion and expected to nearly triple in the coming years. You can read more about this explosive growth at Marketintelo.com. This explosion of content means more sounds are available than ever, making a solid organization system non-negotiable.
There’s no single “best” method here; the right system is whatever works for your brain. The ultimate goal is speed and intuition.
The best sample library is the one you don’t have to think about. Your folder structure should feel like a natural extension of your creative process, allowing you to find sounds by instinct, not by searching.
To help you get started, we’ve broken down some of the most effective methods producers use to keep their libraries in check.
Sample Library Organization Strategies
Choosing how to structure your sound library can make or break your workflow. A logical system means less time searching and more time creating. Below is a comparison of a few popular strategies to help you decide which approach fits your production style best.
| Organization Method | Pros | Cons | Best For |
|---|---|---|---|
| By Source/Creator | Easy to remember where packs came from; good for brand loyalty. | Can be hard to find a specific type of sound across different packs. | Producers who favor the distinct style of certain creators or labels (e.g., Cymatics, Splice). |
| By Genre | Excellent for quickly finding a specific vibe (e.g., Trap, House, Lofi). | Some packs cross genres, making them hard to categorize. | Multi-genre producers who need to switch between different musical styles quickly. |
| By Instrument Type | The most direct way to find a sound (e.g., all kicks in one folder). | Requires significant upfront effort to sort individual samples from packs. | Producers who know exactly what sound they need and want the fastest access to all available options. |
No matter which strategy you pick, the most important thing is to be consistent. A well-organized library will save you countless hours of frustration and, more importantly, keep you locked in that creative flow state.
For a deeper dive into making the most of these new assets in your projects, be sure to check out our complete guide on how to use samples in FL Studio.
Turning Free Samples into Signature Sounds
Having a library bursting with free FL Studio sound packs is a lot like a chef having a fully stocked pantry. You’ve got all the raw ingredients, but the real magic doesn’t start until you start cooking. This is the moment you switch from being a technician downloading files to an artist crafting your own signature sound. The goal isn’t just to use samples—it’s to completely transform them.
It’s easy to fall into the trap of using loops and one-shots exactly as they come. Sure, it’s great for getting ideas down fast, but true innovation happens when you start messing with the audio. Even the most basic samples can become unrecognizable—and uniquely yours—with just a few creative tweaks.
Breathing New Life into Audio Loops
That simple drum loop or melodic phrase is a fantastic starting point, but it’s rarely a perfect fit for your track right out of the box. Instead of just dropping it in, treat it like a block of marble you’re about to sculpt. Fortunately, FL Studio’s Playlist and Channel Rack are packed with powerful tools to make any loop your own.
Here are a few game-changing techniques to try:
- Chop and Re-sequence: Grab the Slice tool (Shift + Alt + T) in the Playlist to cut a loop into smaller pieces. Now you can rearrange those chops to build a totally new rhythm or melody that locks into your song’s groove.
- Pitch and Time Stretching: Just double-click any audio clip to pop open its settings. From there, play around with the Pitch knob to shift its key, or twist the Time knob to match its tempo to your project. Pushing these to the extreme can create some really interesting textures and artifacts.
- Reversing Audio: In the audio clip settings, you’ll find a “Reverse” button. Click it. This classic trick can turn a boring cymbal into a massive swelling riser or a simple piano line into a haunting, ethereal soundscape.
By mixing and matching these methods, a single generic loop can become the source for dozens of unique ideas. It’s the best way to make sure your music doesn’t sound like a carbon copy of the original sound pack.
The Hidden Power of MIDI and Construction Kits
While audio samples give you sound in an instant, MIDI files offer something much more powerful: total creative control. Think of a MIDI file less like a finished sound and more like a musical blueprint. It holds all the notes, chords, and timing for a melody, but it leaves the most important decision up to you—what instrument plays it?
MIDI is the ultimate tool for customization. It separates the musical idea from the sound itself, letting you assign a complex chord progression to a soft piano, a gritty synth bass, or even a full string orchestra.
This flexibility is exactly why MIDI is so valuable for both learning and creating. You can pull apart chord progressions to finally understand the music theory behind them, rewrite melodies to fit your vision, and cycle through different virtual instruments until you land on the absolute perfect tone.
Construction kits take this idea a step further. They are basically deconstructed songs, giving you every individual track (or “stem”) as a separate audio file, often alongside the MIDI. When you load a construction kit into FL Studio, you get to see exactly how a professional track was layered, mixed, and arranged. It’s like getting a private lesson from the producer who made it.
The Producer’s Guide to Quality and Legal Safety
When you’re making music, what you don’t know can absolutely come back to bite you. Diving into the world of free FL Studio sound packs is a blast, but doing a little homework upfront can save you from huge headaches down the road. It really boils down to checking two things for every download: the technical quality and the legal stuff.
Think of it like checking out a used car before you hand over any cash. You’d pop the hood, listen to the engine, and definitely look at the title and registration, right? The same logic applies here. You need to listen closely to the actual sounds and read the fine print to make sure you’re building your track on a solid, legitimate foundation.
Trust me, this little bit of time is a small price to pay to protect your music and your career.
Checking for Technical Sound Quality
Not all audio files are created equal, and the first clue is the file format. A professional sound pack should always give you files in .WAV format. WAVs are uncompressed, meaning they keep every bit of the original audio quality. If you open a pack and it’s full of .MP3s, that’s a big red flag.
Next, it’s time to trust your ears. A quick listen can save you from a world of pain when you’re trying to mix.
- Listen for Noise: Pop on a good pair of headphones and listen for any junk in the background. Hiss, hums, or weird clicks in the samples are signs of a sloppy recording.
- Check for Clipping: Does the sound distort or crackle when it gets loud? That’s clipping, and it’s a sign of a poor recording that’s almost impossible to fix later on.
- Evaluate Bit Depth: This info isn’t always listed, but if you can, look for packs recorded at 24-bit instead of 16-bit. A 24-bit recording gives you more dynamic range and a cleaner signal, which means more flexibility for you during production.
Going through this checklist makes sure the ingredients you’re using are clean and professional, so they won’t tank the quality of your final mix.
Understanding Your Legal Rights
Okay, this is the part most producers want to skip, but it’s easily the most important. The market for Digital Audio Workstations is on track to hit $7 billion by 2033, and a big chunk of that—a 34% growth—is driven by independent producers who need legally cleared content. If you want to discover more about this industry trend on MarketDataForecast.com, you’ll see why this is a big deal. The more producers there are, the more important it is to have your legal ducks in a row.
Inside every legit sound pack, there should be a license agreement, usually just a simple .txt file. You have to read this file. It’s your legal permission slip.
The term “royalty-free” is your creative hall pass, not a free-for-all. It usually means you can use the sounds in your commercial music releases without paying ongoing fees, but it almost never means you can turn around and sell the raw sounds yourself.
Look for key phrases like “commercial use permitted” to make sure you can actually use these sounds in songs you plan to sell or stream. Understanding these terms protects you from nasty copyright claims that could completely derail your career. For a deeper dive on this, check out our guide on royalty-free drum loops.
Start Building Your Professional Library Now
Alright, you’ve made it this far. You now have the full playbook on how to build a killer, totally legal sound library without dropping a single cent. We’ve walked through finding top-tier free FL Studio sound packs, getting them into your projects, and twisting them into sounds that are uniquely yours.
The only thing left to do? Get in there and start making some noise.
The distance between a great idea and a finished track is having the right sounds ready when inspiration strikes. Starting with a trusted source is the smartest first move for any producer.
The best way to start is right here, right now. Put what you’ve learned into practice by creating your free account at FL Studio Sound Packs. You’ll get instant access to our hand-picked, rotating selection of freebies.
It’s the simplest way to start building a professional toolkit you can count on, making sure your next beat is your best one yet.
A Few Common Questions About Sound Packs
Stepping into the world of free music resources can feel a bit like the wild west. You’ve got questions about legal stuff, quality, and whether your tracks will end up sounding like everyone else’s. Let’s clear the air and tackle the most common questions producers have about using free FL Studio sound packs.
We’ve rounded up the top queries we hear all the time and laid out some direct, no-nonsense answers so you can get back to what you love—making music.
Are Free FL Studio Sound Packs Actually Royalty-Free?
For the most part, yes. Legitimate free sound packs almost always come with a royalty-free license. This is your green light to use the sounds in your commercial projects, whether you’re uploading a track to Spotify or selling beats on BeatStars, without owing the creator any future payments.
But “royalty-free” doesn’t mean it’s a total free-for-all. You absolutely have to read the license agreement that comes with the download—it’s usually a simple .txt or .pdf file. This little document spells out exactly what you can and can’t do.
Key takeaway: The biggest rule you’ll see is that you can’t just resell or repackage the original, raw samples and call them your own sound pack. Always check the fine print to make sure you’re covered.
Will Using Free Packs Make My Music Sound Generic?
This is a huge fear for a lot of producers, but the answer is a hard no—not if you put your own spin on things. Sure, a popular loop might pop up in a few tracks, but the real magic is in how you flip it. Your DAW is a sonic playground, and a sample is just the raw ingredient.
Think of it like this: two different chefs can start with the exact same flour, water, and salt, but one makes a rustic sourdough and the other makes a Neapolitan pizza. It’s all about what you do with the basics.
To make any sound uniquely yours, try a few of these tricks:
- Get Creative with Effects: Drench a sound in reverb, slap on some delay, or run it through a distortion plugin. A few simple effects can completely change its vibe.
- Chop and Screw: Don’t just drag and drop a loop. Slice it up into smaller pieces and rearrange them to create a brand new melody or rhythm.
- Layer Up: Combine different one-shots to build a sound with more character. Stacking two or three different snares, for instance, can create a much thicker and more powerful hit than any single sample could on its own.
Once you start processing, chopping, and layering, the final track will sound like you, not the pack it came from.
What’s the Big Deal Between WAV and MP3 Samples?
For music production, the difference is night and day, and you should always, always go for .WAV files. A .WAV file is like a high-resolution, uncompressed photo—it has every last bit of the original data, giving you the absolute best audio quality possible.
An .MP3, on the other hand, is more like a compressed JPEG. To shrink the file size, a bunch of audio data gets thrown out forever. While that’s fine for listening to music on your phone, it’s a disaster for production. The moment you start stretching, pitching, or processing a low-quality .MP3, you’ll hear nasty digital artifacts and noise creep into your mix, which can totally ruin a track. Any professional free FL Studio sound pack worth its salt will give you everything in .WAV format.
Ready to put this into practice and start building a pro-level sound library? At FL Studio Sound Packs, we make it simple. Sign up for a free account today and get immediate access to our rotating selection of top-tier, royalty-free samples and kits. It’s time to download your first professional sounds and get cooking.